A Primer on Tofu
- donnaacostapllc
- Aug 18, 2025
- 5 min read

Are you trying to cut back on how much meat, poultry, or seafood you eat? Many people are experimenting with a flexitarian diet, and enjoying more vegetarian meals for the health benefits, or to cut back on runaway grocery store prices.
Or maybe you're interested in tofu because you'd like to replace meat, poultry, or seafood with a plant-based product, because you want to reduce your saturated fat or cholesterol intake. Maybe you want to hack your health by eating 30 different fruits, vegetables, nuts, seeds, grains, and legumes a week.
I teach an online cooking class, and sometimes, students have a soy allergy, or they just say "Nope!" to cooking with tofu. But some students are just...intrigued by tofu. They've had it at an Asian restaurant, and they're curious about how they might work tofu into their menu.
Regardless of your motivations, if you'd like to eat more healthfully and save money while you do so, I encourage you to keep reading this primer on tofu!
I’ve been a fan of tofu since the mid-90s. I use Mori-Nu’s tofu to replace eggs in desserts and entrees, and as a replacement for heavy cream in appetizers, soups, and entrees, from sweet potato pie to tomato Madras soup, to pasta with asparagus and peas in lemon cream sauce and methi matar malai, to deviled eggs and egg salads. (My kids have joked for years that I should be a spokesperson for Mori-Nu tofu, because so many of my recipes use their tofu.)
I love Mori-Nu because it’s silken tofu (which means you can puree it, and its texture is smooth, not grainy), and because Mori-Nu has the mildest flavor of any tofu I’ve ever tried. Instead of tasting nutty or beany, its mild flavor tastes almost the same as heavy cream.
Unfortunately, silken tofu doesn’t work well as a replacement for seafood, chicken, or beef. Its texture is similar to the white of a hard-cooked egg, so it’s too delicate to press, and it crumbles easily when you cook it.
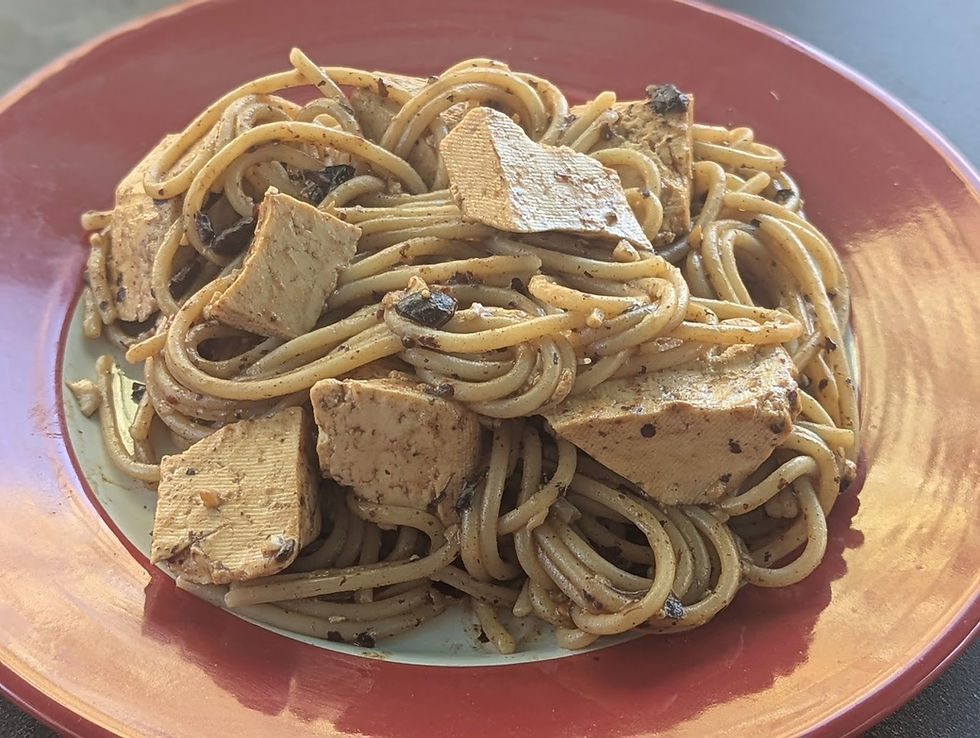
Non-silken tofu has a chewier, less delicate texture, which makes it ideal for replacing seafood, chicken, and beef. I’ve found that House tofu is the mildest-flavored water-pack tofu I've found. Like Mori-Nu, its flavor isn't nutty or beany, and it just blends right into any recipe.
I’ve never really gotten into using non-silken tofu, though, because water-packed tofu (regardless of brand) contains too much water to make a useful replacement for meat, fish, or poultry. It crumbles easily, and the texture is too spongy for my taste.
Freezing tofu is an effective way to remove water, and results in a texture that’s remarkably meat-like. However, I don't have patience to wait a couple of weeks to get a seafood-like texture, let alone a month of freezing to get a chicken-like texture.
To complicate matters further, if your tofu stays in the freezer past six weeks, the textural quality begins to decline. After a few months, the texture is more like ground beef (which can be useful, but wasn’t always the texture I wanted). Keeping track of which tofu is ready to be eaten, which tofu hasn’t been in the freezer long enough, and which tofu needs to be eaten immediately was a hassle.
On top of this, House tofu is water-packed, which means it’s perishable. (In contrast, Mori-Nu tofu is aseptic-packed, so it lasts for months in the pantry or fridge). Calculating how much water-pack tofu to buy in order to freeze it and use it up, then draining and freezing and waiting and defrosting, made incorporating water-pack tofu into meals unfun. And the nearest store that carried House tofu was a half-hour drive, so I focused on ways to incorporate Mori-Nu tofu into my meals.
Recently my grocery store began carrying House tofu, and this inspired me to spend some time on the ‘net searching for an alternative to freezing tofu. Manually pressing tofu instead of freezing sounded effective (if messy), but I didn’t want to expand my carbon footprint by pressing tofu using paper towels. I have a small house and an even small kitchen, so the idea of buying and storing kitchen towels to use for this purpose didn’t appeal to me, either.
Then I stumbled across tofu presses, and bought this one. It sounds melodramatic to say “This tofu press has changed my life,” but seriously, it has. Thanks to the addition of tofu to my meals, I’m able to reduce the amount of seafood, eggs, and dairy I consume. This benefits the environment, but because tofu is considerably less expensive than seafood, eggs, cheese, yogurt, etc., it also benefits my bottom line. And the protein content of tofu makes it filling, which means I’m less hungry between meals.
How does a tofu press work? It’s simple: You put your tofu in the press, snap the lid on, and put it in the fridge for anywhere from 30 minutes to 6 hours (or overnight). The press pushes out and collects water from the tofu. When you're ready to use your tofu, you remove it from the press. It’s that easy! The press is easy to hand wash, and it's dishwasher safe. Best of all, the final product is fantastic—while it’s not quite as chewy as frozen tofu, the texture is remarkably similar to seafood or chicken.
One other advantage of pressing tofu is that doing so makes it easier to cook. With much of the water pressed out, it’s less crumbly. You can slice it and marinade it (as I do in the recipe I'll share next week), bake it, or cook it in sauce. Either way, the smaller you slice it, the more marinade or sauce it takes up. If you prefer, you can leave it as a block, because House tofu is so mild you don’t need to mask the flavor.
I'll post the recipe for Thai Mushroom and Tofu Salad next week, based on pressed House tofu. If you'd like to add in more tofu to your eating pattern, you've got time to pick up a press, find House tofu, and get ready to enjoy a salad that's delicious and filling, and it's good for you and the environment, too!
Like what you're reading?
Click here for a free weekly email every Monday,
scroll down to leave a comment or a rating,
or click on the three dots at the top of the page to share with a friend!
(If you're not getting your email, check your Promotions, Updates, Junk, Spam, etc. folders!)
If you click on the links in this post and make a purchase, I earn a small finder's fee on qualifying purchases as an Amazon Associate, at no cost to you.
This website is for educational purposes only. It is not intended to be a substitute
for or to replace working with a doctor, therapist, or any other care provider.
I assume no responsibility for errors, inaccuracies, omissions, or other
inconsistencies, and disclaim any liability to any party for any events,
including but not limited to loss, damage, or disruption, whether loss,
damage, or disruptions results from negligence, accident, or any other cause.
Your use of the information on this website is at your own risk.
1
Searing the Beef
Sear beef fillets on high heat for 2 minutes per side to form a golden crust. Let it cool before proceeding to keep the beef tender.
1
Searing the Beef
Sear beef fillets on high heat for 2 minutes per side to form a golden crust. Let it cool before proceeding to keep the beef tender.
1
Searing the Beef
Sear beef fillets on high heat for 2 minutes per side to form a golden crust. Let it cool before proceeding to keep the beef tender.
1
Searing the Beef
Sear beef fillets on high heat for 2 minutes per side to form a golden crust. Let it cool before proceeding to keep the beef tender.
Notes


1
Season the good fresh beef fillets with salt and black pepper. Heat olive oil in a pan over high heat and sear the fillets for 2 minutes per side until it fully browned. Remove the beef from the pan and brush with a thin layer of mustard. Let it cool.
1
Season the good fresh beef fillets with salt and black pepper. Heat olive oil in a pan over high heat and sear the fillets for 2 minutes per side until it fully browned. Remove the beef from the pan and brush with a thin layer of mustard. Let it cool.
1
Season the good fresh beef fillets with salt and black pepper. Heat olive oil in a pan over high heat and sear the fillets for 2 minutes per side until it fully browned. Remove the beef from the pan and brush with a thin layer of mustard. Let it cool.
1
Season the good fresh beef fillets with salt and black pepper. Heat olive oil in a pan over high heat and sear the fillets for 2 minutes per side until it fully browned. Remove the beef from the pan and brush with a thin layer of mustard. Let it cool.
Instructions
Quality Fresh 2 beef fillets ( approximately 14 ounces each )
Quality Fresh 2 beef fillets ( approximately 14 ounces each )
Quality Fresh 2 beef fillets ( approximately 14 ounces each )
Beef Wellington
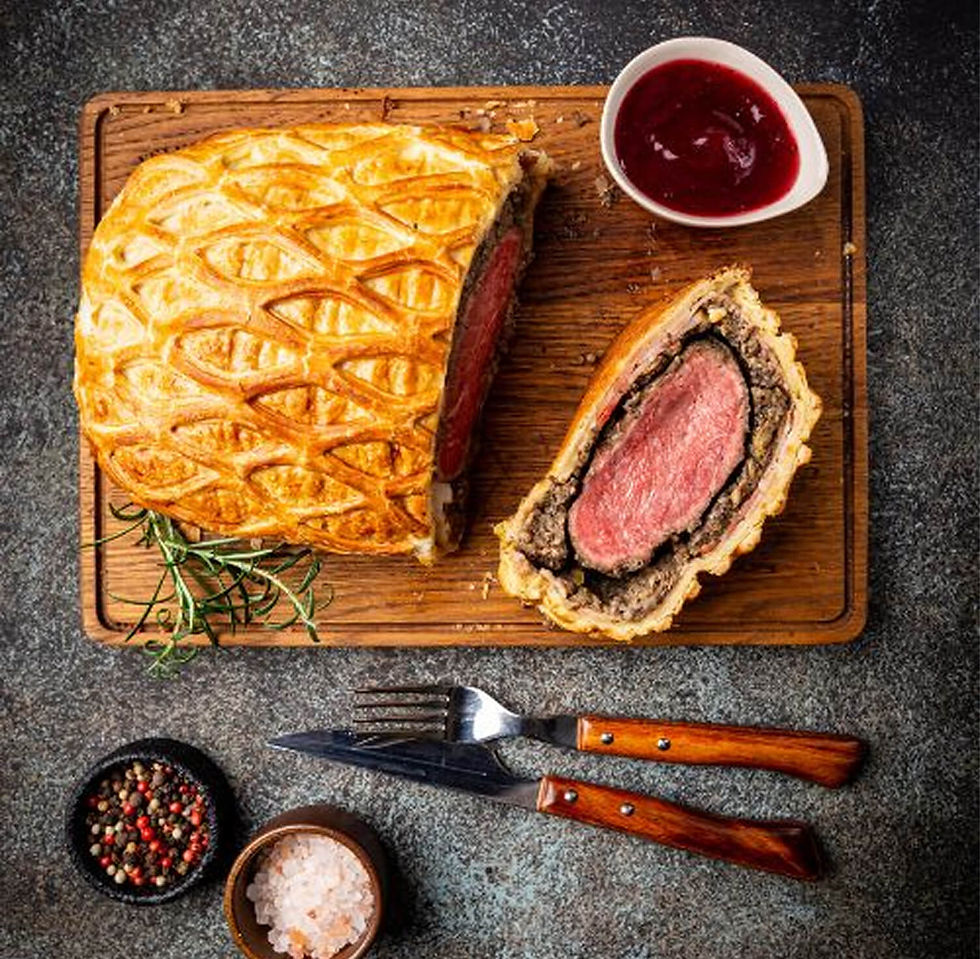
Beef Wellington
Fusion Wizard - Rooftop Eatery in Tokyo
Author Name
%20(1).jpg)
Beef Wellington is a luxurious dish featuring tender beef fillet coated with a flavorful mushroom duxelles and wrapped in a golden, flaky puff pastry. Perfect for special occasions, this recipe combines rich flavors and impressive presentation, making it the ultimate centerpiece for any celebration.
Servings :
4 Servings
Calories:
813 calories / Serve
Prep Time
30 mins
Prep Time
30 mins
Prep Time
30 mins
Prep Time
30 mins

Comments